
The control starts up in Incremental jog mode. In order to jog the axes in continuous movement, you need to press the INCR/CONT key to switch from incremental to continuous jog mode.
The Machine Home position is fully X- (table right), Y+ (saddle forward) and Z+ (head up).
|
The control starts up in Incremental jog mode. In order to jog the axes in continuous movement, you need to press the INCR/CONT key to switch from incremental to continuous jog mode. |
 The work light
will come on automatically when the machine is powered up.
The work light
will come on automatically when the machine is powered up.
You can turn the light off and on by pressing the work light key on the jog panel.
Tool carousel positions are numbered 1 through 12. Tools and offsets are numbered 1 through 199. Any tool number can be used in any carousel position. Tools are assigned to carousel positions ("bins") in the Tool Library.

You can insert and remove tools by hand when needed, using the tool release pushbutton on the front of the head.
In a program cycle, tool changing is automatic, with the M6 code and T number in your CNC programs.
In manual and setup operations, you can change tools automatically by using the ATC function key (F7 on the Setup menu and in the Tool Offset Library; or by entering an M6 tool-change command at the MDI prompt (F3 on the main menu).
In normal operation, the Auxiliary keys on the jog panel have the following functions:
 |
No function |  |
No function |  |
No function |
 |
No function |  |
No function |  |
No function |
|
Work Light On/Off |
 |
Rotate carousel minus |  |
Rotate carousel plus |
| (Aux10) | No function | (Aux11) | No function | (Aux12) | Maintenance Mode On/Off |
| M0 | Stop (wait for Cycle Start) |
| M1 | Optional Stop (wait for Cycle Start) |
| M2 | Program Restart (with wait for Cycle Start) |
| M3 | Spindle CW / Forward |
| M4 | Spindle CCW / Reverse |
| M5 | Spindle Stop |
| M6 | Tool Change |
| M7 | Mist Coolant On |
| M8 | Flood Coolant On |
| M9 | Coolant Off |
| M15 | Unclamp Tool |
| M16 | Reclamp Tool |
| M18 | Initialize ATC |
| M19 | Orient Spindle |
| M50 | Index Carousel Forward One Position |
| M51 | Index Carousel Backward One Position |
| M80 | Move Carousel In (to Spindle) |
| M81 | Move Carousel Out (to Park) |
M functions M91 and above are used internally in custom macro programs, but are generally not used directly in user machining programs.
See Chapter 12 of the Centroid T-Series Operator's Manual for descriptions of the higher-numbered M functions.
In rare cases it may be necessary to operate the tool changer components manually. You can do this with the Aux keys on the jog panel, but only in "Maintenance Mode". To activate Maintenance Mode, press and hold the Aux12 key on the jog panel for one second. The light in the Aux key will come on, indicating that Maintenance Mode is active. To cancel Maintenance Mode, press the Aux14 key and hold for one second again.
Aux12 is the blank gray key below the Aux9 or "Tool Index +" key.

You must cancel Maintenance Mode before you can run normal program cycles.
There are no safety interlocks in Maintenance Mode. You must be careful, among other things, to:
In Maintenance Mode, the following Auxiliary keys on the jog panel have special functions:
|
Spindle Orient/Cancel | |
Tool Unclamp/Clamp | ||
|
Carousel Out (Retract) | |
Carousel In (Advance) | ||
| (Aux12) | Maintenance Mode On/Off |
The PLC program can generate a number of system-specific error and fault messages, in addition to those listed in the Centroid operator's manual.
You can use the PLC Diagnostic display on the console to view some of the Centroid PLC input and memory locations mentioned with these error and fault conditions. At the control's main screen, press Alt-I to activate the PLC Diagnostic display. Press Alt-I again to dismiss it.
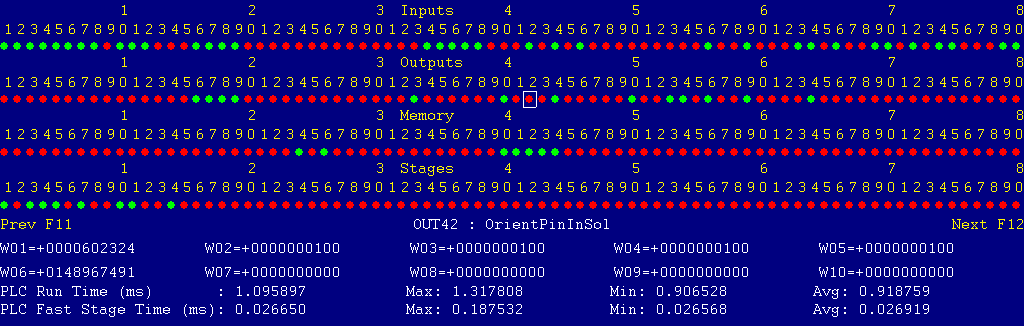
Each page of the Diagnostic display shows four rows of red and green dots: the first row shows PLC inputs 1 through 80; the second row PLC outputs 1 through 80; the third row PLC memory bits 1 through 80; and the fourth row PLC program stages 1 through 80.
You can use the arrow keys to move a highlight box over any of these locations. The name of the highlighted location will be displayed in the center of the screen below the red and green dots.
For example, in the illustration above the highlight box is on Output #42: The dot below the 2, to the right of the superscript 4, on the second line.
Below the four rows of bit status information are ten numeric ("word") variable values, labeled W1 through W10. Some of these variables also hold useful status information, described with the error and fault conditions to follow.
There are multiple pages of Diagnostic data. With the Alt-I diagnostic display showing, you can use the F12 and F11 keys to scroll right and left. For example, pressing F12 once will shift to the page showing inputs and outputs 81 through 160, and word variables W11 through W20.
Messages with 9000-series message numbers are Faults. After resolving the problem, you must press and release the Emergency Stop button to clear a Fault.
Messages with 8000-series message numbers are Errors. Errors will cancel the program cycle and stop the spindle and coolant, but they do not then need to be explicitly reset.
Messages with 5000-series and 2000-series message numbers are Warnings and Informational Messages. They do not cancel the cycle or require any action to reset.
The control detected an internal error in processing the PLC logic program.
Report this error to your dealer, along with the values from W14 and W15. Also report what function the machine was performing when the fault occurred.
You must shut down and cycle the power to clear this fault.
References:
PLC W14: Copy of internal SV_PLC_FAULT_STATUS, indicating the type of problem
PLC W15: Copy of internal SV_PLC_FAULT_ADDRESS, indicating the location of the problem
The MPU11 motion controller detected loss of fiber optic communication from the RTK3 interface unit.
Check the optical fibers. Verify that they have not been bent, kinked, or pulled loose from their sockets. Verify that they are both plugged into the correct sockets (1 to 1 and 3 to 3, on both boards).
Verify that six green status LEDs on the RTK3 bottom board are lit. If no LEDs are lit on the RTK3 unit, check its logic power, which is derived from the 120VAC input to the top board.
The spindle drive unit is reporting a fault condition.
Check the LED display on the spindle drive itself for a fault code.
Press and release Emergency Stop to clear the fault.
References:
PLC INP25: indicates spindle drive status. Green = closed = okay, Red = open = fault
The control detected loss of communication from the jog panel in the operator console.
Check for damage or disturbance to the cable between the jog panel and the MPU11 board in the control cabinet.
Press and release Emergency Stop to clear the fault.
References:
PLC MEM43: Indicates incoming jog panel communication status. Green = okay, Red = fault
The jog panel in the console reported back to the MPU11 control board a loss of communication from the control unit. This indicates the return signal from the pendant is functioning normally, but the outgoing signal may have problems.
Check for damage or disturbance to the cable between the jog panel and the MPU11 board in the control cabinet.
Press and release Emergency Stop to clear the fault.
References:
PLC MEM44: Indicates outgoing jog panel communication status. Green = okay, Red = fault
You exited the CNCM control software without first pressing Emergency Stop.
Always press Emergency Stop prior to exiting the control software.
Press and release Emergency Stop to clear the fault.
The tool-clamped switch and tool-unclamped switches were both closed at the same time. This indicates a switch failure or wiring fault which must be corrected before further operation.
The carousel-in and carousel-out switches were both closed at the same time. This indicates a switch failure or wiring fault which must be corrected before further operation.
You attempted to start an automatic program cycle, but Maintenance Mode is still active.
Press and hold the Aux12 key for one second, until the Aux12 LED goes out.
During tool carousel rotation, the tool counter input changed state earlier than normal motor rotation would allow. This may indicate that a false signal due to electrical noise.
The "(1)" version of the message is used when the early change happens while moving out of one position, into transition.
Use the Tool Index Plus or Minus auxiliary keys to move the carousel the rest of the way into a tool position, then press Alt-K to display the system's current carousel position, and compare it with the actual carousel position.
If the system's position does not match the actual position, then use the ATC Reset key on the Tool Library screen to correct it.
During an automatic tool change, the carousel did not rotate out of the current position in the allowed time.
If this message appears without any movement of the carousel, then it is either a power problem (unable to get power to the carousel motor) or a physical obstruction.
If this message appears while the carousel has been rotating, then it is probably an issue with the tool counter sensor.
During tool carousel rotation, the tool counter input changed state earlier than normal motor rotation would allow. This may indicate that a false signal due to electrical noise.
The "(2)" version of the message is used when the early change happens while moving out of transition, into the next position.
Use the Tool Index Plus or Minus auxiliary keys to move the carousel the rest of the way into a tool position, then press Alt-K to display the system's current carousel position, and compare it with the actual carousel position.
If the system's position does not match the actual position, then use the ATC Reset key on the Tool Library screen to correct it.
During an automatic tool change, the carousel did not rotate into the next position in the allowed time.
If this message appears without any movement of the carousel, then it is either a power problem (unable to get power to the carousel motor) or a physical obstruction.
If this message appears while the carousel has been rotating, then it is probably an issue with the tool counter sensor.
A request was made to load a tool from, or put away a tool in, an invalid carousel position. Valid carousel positions are 1 - 12.
This likely means that the control's internal variables have been corrupted. Use the ATC Reset feature (F2 on the Tool Library screen) to set the correct values. Also verify that Machine Parameter 161 is correctly set to the number of carousel positions.
You attempted an automatic tool change, without adequate air pressure.
Verify that the air line is connected and that pressure is sufficient.
References:
PLC INP32: indicates air pressure switch state. Green = closed = pressure up, Red = open = pressure low
The spindle drive reported a loss of orient, while the control maintained its M19 spindle-orient request.
An attempt was made to start, run, or orient the spindle while the drawbar was open (unclamped).
During a program cycle, with no tool change in progress, the control detected a spurious tool-change acknowledge signal.
During a program cycle, with no tool change in progress, the control detected that the tool-clamped switch was not closed.
During a program cycle, with no tool change in progress, the control detected that the tool-unclamped switch was closed.
During a program cycle, with no tool change in progress, the control detected that the tool carousel was in the transition zone between valid tool positions.
The program attemped to run an M3 or M4 spindle-start code, but the control is still in Manual Spindle mode.
Press the SPIN AUTO/MAN key in the top row of the operator panel to select Auto Spindle mode (LED on); then press CYCLE START to resume program operation.
The program attempted to run an M7 or M8 coolant-on code, but the control is still in Manual Coolant mode.
Press the Coolant AUTO/MAN key at the left side of the coolant controls row of the operator panel to select Auto Coolant mode (LED on); then press CYCLE START to resume program operation.
If you want to run the program cycle without coolant, you can press CYCLE START to resume operation without restoring Auto Coolant mode.
A previous servo drive fault condition has been resolved, and cleared with Emergency Stop.
A previous PLC fault condition has been resolved, and cleared with Emergency Stop.
You inadvertently pressed a keyboard combination that is used for keyboard jogging controls, but keyboard jogging features have been disabled on this machine.
A previous fault condition has been cleared with Emergency Stop.
A previous carousel rotation was stopped due to one of the noise fault conditions (8181 or 8183); and the carousel has now been moved back into a recognized position.
Displayed when you have used the ATC Reset, ATC Init, or M18 functions
to reset the control's internal tool changer states.
![]()